top of page
During my year of study at Rubika France (2016) I joined a team of 5 to participate in the Imagine Cup game development competition. For its first phase we had to submit a PowerPoint presentation for a concept we wished to build from in the next phases. We called ours "Beasts". The team was composed of two designers, two game artists and one game programmer. My main responsibility was the level design.
During the pandemic, I took part in a course called Level Design For Games (new tab) on the elearning platform cgmasteracademy. It was a course produced by Emilia Schatz (Lead Game Designer at Naughty Dog) and supervised by Patrick Haslow (Advanced Level Designer at Warner Bros games).
At the end of the course I was provided with a certificate of achievement certifying that I received a passing grade.

CGMA Level Design For Games Showcase (Part 1, 18min, 2 Levels)
Lire la vidéo
CGMA Level Design For Games Showcase (Part 2, Commentary, 22min, 2 Levels)
Lire la vidéo
Notable Levels Breakdown
1. Exploration Design Level
The level we had to make during week 7 was the conclusion of multiple lessons on exploration design. Therefore, we had to create a compelling experience for the players using essentially its layout, without combat, but with a focus on overall geometry and structure. The level had to be inspired by paintings of the artist Jean-Pierre Ugarte or other maze-like structures, reconquered by nature, like what you can find in The Maze Runner movies.


A few paintings made by Jean-Pierre Ugarte
Beat 1 - Introduction & Vista
My level starts in a dark and narrow corridor. There,
a very visible reward is placed. It serves to teach players to look for them as well as guide them to a spot where the funneling effect of the corridor is amplified for the following vista.
This vista has multiple purposes : It serves to read quickly the large open space that is next. Amplified by its low angle, it conveys a sense of wonder, of being outscaled by the structures. It also introduces what will become an important landmark.


Beat 2 - Exploration
From the vista, the players can distinguish a kind of natural path. It it formed by a few standing out platforms, contrasting with the water. They can also perceive the sort of logical sequence of platforms that go up the waterfall.
Some rewards are placed carefully to attract the player's eye at some points, allowing this open area to be explored in a guided way. One of them can encourage the players to jump over the waterfall, which will eventually lead to another coin down. To get back up faster they can use a shortcut represented by a fallen tree.
Beat 3 - Danger Path & Second Reveal
When the players reach the top of the waterfall they go through a quite comfortable space that feels sheltered. It is filled with rectangular shapes that we tend to associate with strength and security. Then, they are forced to enter a narrow
triangular corridor filled with sharp shapes that we associate with dynamism or danger.
Once through, the players are given a sort of second vista, where they can see the mountain landmark again and perceive more details about it. Notably the contrasting waterfall temple on top of it.


Beat 4 - Separation with the river
A bit further, the path following the river upstream is blocked by ruins and a reward is used to do some teasing / foreshadowing again to indicate that there is something that way anyway. At this point, the players are accustomed to follow the riverbed and know that the landmark they aim for is probably its source and the final objective. Regardless, they are forced to enter a thorny, dark and narrow cave that seem to go completely another way. As a consequence, it creates spatial and directional pressure.


Beat 5 - Final Ascension
After going through the cave, the players finally end up back on the banks of the river and they can find the rewards teased earlier, therefore, sweeping away the frustration. Right after, they start their final ascension in a big open space, centered around stairs and pillars leading to the final, most important rewards. Here, to create a sense of sacred I used scale, symmetry and important vertical lines.
To summarize, in order to achieve the design goals of the week, my main focus were the variations of the type of spaces the players have to go through. More precisely, the types of environmental pressure that accompany them. Furthermore, by intentionally placing them in sequences, playing more or less with their differences and similarities, I was able to generate contrast that enhance the effects desired for the overall pacing of the level.
This, coupled with other factors like foreshadowing, obtaining rewards, using scale, shape perception, fears like vertigo, getting closer or away from landmarks... I was able to modulate the experience as the player progresses.
Here are 2 graphs showing, firstly, how I placed the different elements of the geometry on a spectrum between restriction and choice paralysis. Secondly, how I think they impact the overall intensity experienced by the players in combination with the other factors.
In the first, the furthest an element is placed from the middle "sweet spot" of spatial comfort, where the player feels covered but with yet a sense of freedom of movement, the more it converts into experienced intensity for the player.
As a disclaimer I should mention that agoraphobia is not the exact opposite of claustrophobia. However, it definitely encapsulates the fear of being exposed in wide open spaces, or inside depressed terrain where you feel surrounded etc. It also touches the concept of lack of covers, shelter.

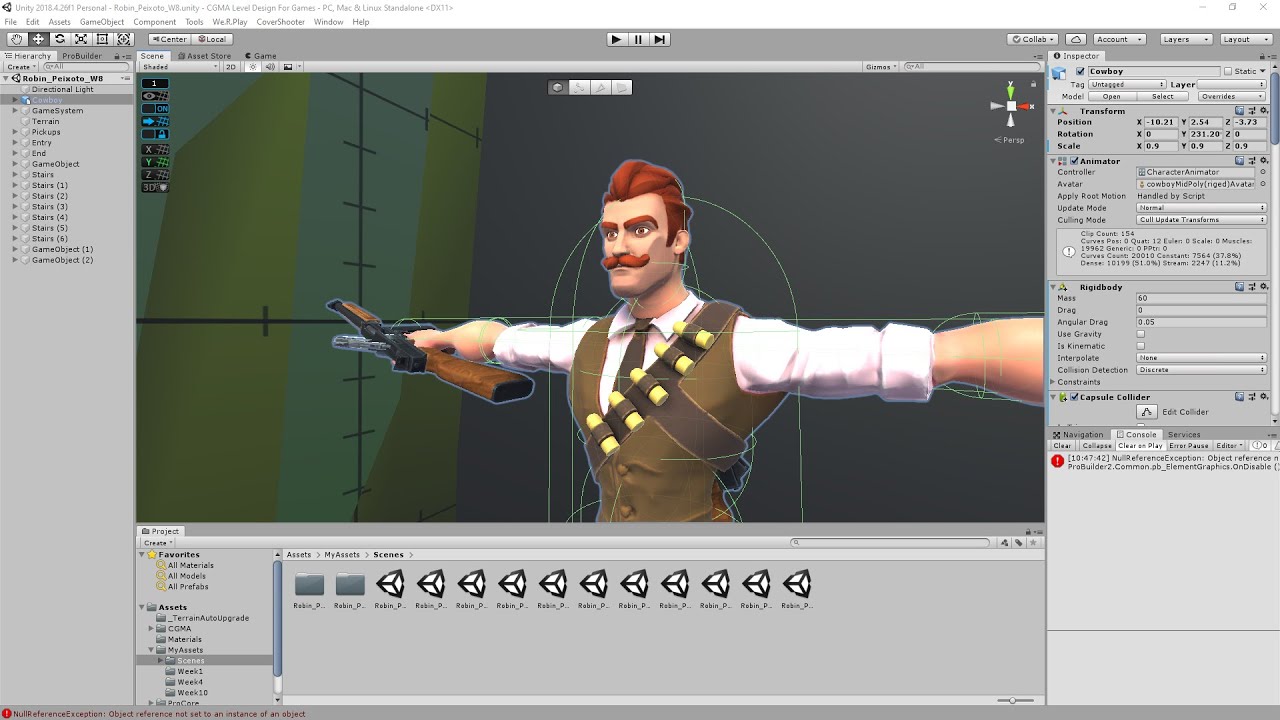
2. Final Level
For the final week we had to create a level that included a bit of every lesson covered during the course. Similarly to the previous showcased level, we had to use the layout to enhance the experience intended, which is why it won't be as detailed in this breakdown.
At the same time we had to consider what we learned during combat & battlefield design lectures. It had to include at least two combats with multiples approaches and ramping difficulties. This time, as a base for our level we were given a small story pitch :
"Many years ago, the cowboy's mother was a prospector and struck it rich. Unfortunately, her partner betrayed her and stole all the gold for himself. The cowboy's mom tracked him down but he died before she find out where he stowed all the gold. Recently the cowboy happened upon some clues about the gold location. But his sworn enemy overheard his plans to find it and has gotten here first, with a small army of desperados. They'll use any means necessary to keep the cowboy from his treasure."


Beat 1 - Starting & Vista
The players start on a boat stranded on a small isolated beach. It is the low tide therefore a lot of sharp shaped reefs indicate the boundaries of the water. To progress, they go through a cave that funnels the player to another beach and a vista.
This vista is composed mainly of a rocky ark that frames the landmark ruins. As a consequence, it is instantly set as the main objective. The ark is also used as an platforming puzzle, a few rewards are placed to guide the players through it.
Beat 2 - Combat Teasing & Valve
When the players approach the ruins they can see other stranded boats that tease the proximity of the enemies to the players. They can do more platforming challenges but eventually they have to go through a path located between two cliffs that intentionally look fragile because of the numerous wooden reinforcements. At the end of it the players fall through a valve, represented by broken stairs.
It has the essential role of locking the players in the fight, and prevent them from fleeing or "kiting", thus, guaranteeing the desired impact of the fight.


Beat 3 - First Combat
After this valve the players are faced directly with the covers of the first combat's battlefield. Its theme is an unloading area for the cargo of the enemy's boat. The main idea for this encounter is to serve as a good warm up for the next fight. Therefore, the number of enemy is limited to 3, with only 1 heavily armed enemy (rifle instead of pistol).
1 enemy patrols but 2 enemies are showing their back. As a consequence, the players can easily sneak up to high covers placed a bit further. Moreover, the players can hardly be flanked as all the enemies and covers are placed directly in front of them.


Beat 4 - Exploration & Platforming
After the fight the players are rewarded with a coin but also a new accessible beach that they can start exploring. Once again, rewards are used to guide them through the open areas. There are also a few more secret areas that can be guessed by observing the environment. After climbing, the players can see the areas they played through potentially conveying a sense of accomplishment. At the end of this phase the players fall down a platform that cannot be climbed back. It is the second valve setting up the final combat.


Beat 5 - Final Combat
After crossing the valve the players can easily reach a few covers that give great visibility of the battlefield. That way, they can evaluate early the different options given to them and plan accordingly. This time, the players face 5 enemies of which 2 are heavily armed ones. 2 pistol enemies patrol on the ground while all the others have the high grounds compared to the players. Additionally, the fight area is much wider which allows flanking and blind spots. All that makes for a much more complex encounter that requires adaptation from the players.
The general idea behind the fight is to create high risk - high reward situations by having the players "earn" advantageous positions.
By earning, I mean that the players must go through risky "skills tests", like fighting their way through multiple enemies, choosing the right timing to switch cover, or sneaking up behind patrols. However, failing to do so could mean being in a very vulnerable position, between two covers for example.
Before the fight, 2 main approaches can be distinguished when sneaking up. An "easy" way that avoids the patrol but, as a compromise,
leads mostly to positions easily flankable and with a low angle (poor lines of sights). A "hard" way that demands to go through very exposed areas, but leads to position where the players can easily neutralize the heavily armed enemies.
The following graph represents how I classified the different positions with their pros and cons :
(Flankable = 1 angle of approach, easily flanked = 2 or more. Grenade sensible = isolated cover, if grenade draws you out = more exposure)

Course Syllabus
(We had to deliver at least one level blockout focusing on the themes we explored each week for feedback)
Week 1 | Getting Started
"What is a "level"? What do level designers do? We'll look at the history of environments in games and their purpose in the overall structure of a game's design. And we'll briefly take a look at the structure of the course. Finally, we'll setup Unity and familiarize ourselves with the pipeline of creating environment mesh and bringing it into the game".
Week 2 | Shapes, Space, and Beyond
"We're going back to basics of architecture this week and exploring components of geometric shape. We'll talk positive and negative space, rules of perception, and how shape influences player behavior and experience".
Week 3 | Elements of Layout
"Let's get organized! We'll learn about the structure of cities and buildings, how players mentally map and utilize space, and how you can create environments that communicate their purpose to the player".
Week 4 | Hit the Books
"It's time to start planning an environment. We'll talk about how designers study and research, gather reference, and create prototypes leading up to the creation of their levels. Learn to look at reference and pick out what evokes a sense of place and atmosphere. Creating immersion means getting your head in the world of the game".
Week 5 | Shape in Sequence
"A level is a story. We'll learn about formal narrative structure and performative techniques. We'll create beat diagrams, pacing, and examine how levels flow from space to space in support of narrative and character development".
Week 6 | Exploration Design
"How do you create spaces that are interesting to explore? We'll look at path flow, valving, risk, rewards, creating mystery, player motivation and investment".
Week 7 | Battlefield Design
"Many games feature some form of combat. We'll dive into cover-based shooter mechanics as a case study for how environmental shape interacts directly with player mechanics".
Week 8 | Multiplayer Combat Design
"This week we'll take a look at what considerations go into creating multiplayer deathmatch style arena maps".
Week 9 | Puzzle Design
"What is a puzzle? We'll analyze one of the hardest types of level setups, and how different games approach puzzle and problem-solving spaces".
Week 10 | Play-Testing and Iteration
"A design isn't done until it ships. It's a humbling experience putting your game in the hands of new players. We'll look at the cycle of iteration and working with other departments to carry your design to gold. Also some final thoughts".
Reflections
dirty many times but also it challenged me theoretically on many fronts.
I was surprised by how complete the lectures were, we often dived deep
into fundamental principles before going back up to explore how our new knowledge could affect our environments.
It gave me the opportunity to create dozens of short levels, each one having a different theme and approach, giving me a broad understanding on how to use knowledge to create interesting level design. Additionally, we were lucky to have Patrick answering our questions, demonstrate workflow tips, to review our work and provide us with feedback through video conferences all along. It was the perfect bridge between theory and practice for me. Honestly I feel like I never learned as much on my job as I did with this course. You could check this article from Emilia herself or this article from another student if you want to know more about the course.

This course was astounding. Initially, I was looking for a way to apply on actual projects what I learned in my other formations during this period. Previously I explored theories such as in architecture, image composition and psychology, but their translation in actual levels were not obvious yet.
So when I found this course on CGMA, I was attracted by the fact that it seemed to concentrate on producing blockouts in engine (and I couldn't ignore the credentials of the instructors as well).
It turned out to be all I expected and more. Not only did I get my hands
One of Emilia's work, used as an example in the course
Final Gallery


bottom of page